Class Follow-Up: Triangle Suspension
This is intended to accompany Shay's Triangle Suspension class and is not stand-alone material.
General Philosophy
More focused on the flyer/person in rope, rather than being rigger or rope/bondage focused.
About movement rather than immobilization.
Note that we will refer to the “flyer,” “person in rope,” or “PIR” rather than “bottom” or another word—this is to be inclusive of self-suspenders and avoid implying a power exchange dynamic in partnered suspensions.
I’ve been playing around with rigs like this for years, but haven’t been to or seen classes on it, and as far as I knew, there wasn’t really a name for it… “Triangle Suspension” made sense to me :-). There are other variations! For example, I’ve seen the same basic rig done with a TK and ankle cuffs.
Negotiation
Before starting, negotiate with your partner if applicable. If you’re self-tying, communicate expectations with your spotter and look inside yourself.
Consider factors like:
Mood/intention
Chest loading tie – asthma (where is the inhaler?), type of chest harness, tolerance, etc
Communication in the moment
Rope marks
Risks
Falls
Because this is a dynamic rig, subject your hard point(s) to extra scrutiny.
The chest upline should be a rated synthetic like POSH or AmSteel, never natural fiber. There are no redundant critical lines and the chest line can shock load. Use a very secure tie-off technique.
For an example of the risks of using a natural fiber upline in this rig type, see this case report.
Injury to joints: if you are hypermobile, be extra cautious exploring ties like this that can push your range of motion.
You have two types of stability:
Static stability, which comes from the ligaments, tendons, and other joint structures
Dynamic stability, which comes from the muscles
If you are hypermobile, you have very little static stability and need to work on extra awesome dynamic stability so you don’t damage your joints!
Just because you can access a certain range of motion doesn’t mean it is safe or sustainable for your body.
Rope marks can occur, especially around the chest and on clavicles/shoulders.
This is a heavily chest-loaded tie.
A chest harness can interfere with breathing, especially in a load-bearing face-down position and especially for someone with pre-existing breathing issues like asthma.
Consider negativity bias (we pay much more attention to negative than positive)
Train yourself to breathe into different areas:
Front
Back
Sides
Diaphram/abdomen
Nerves
Consider your risk profile. No one can make decisions about your acceptable level of risk except you.
Six significant factors contribute to bondage nerve injuries
Individual differences in nerve location and vulnerability
Anatomical location (where on the body you are tying)
Duration of force
Transitioning or staying still
Longer duration = more risk
Severity and type of force (compression or shearing)
Stretch or stress positioning
Environment (internal & external)
Communication (doing checks, coming down if there are signs of problems)
The temperature of the space (cold temperatures = higher risk)
Anything that alters body awareness (having an audience, other distracting stimulation)
This type of suspension:
o When done with an arms-out chest harness, avoids areas that are often highest risk (upper arms)
o Since the flyer is dynamic and in control, there is not generally a long duration or severity of compression in any one spot.
o While the flyer may be moving into stretches, there is not generally stress positioning involved per se, and nothing is held for long.
Therefore, these ties have a relatively low risk of nerve injury for most people.
Even though it’s a relatively low-risk tie, nerve injury is always possible. See this article for much more detail.
Chest harness
Brachial plexus – damage can occur when the shoulder is forced down while the neck stretches away when the arm is forced above/behind the head or with upward pressure into the armpit.
There have also been reports of damage to the intercostal nerves or costal cartilage.
Ankles/feet
Deep peroneal nerve – this can be injured by tight wraps around the ankle, where you might find shoe rims. Symptoms include foot pain and sensory disturbance.
Thighs
Nerves are most at risk in the groin and close to the knee. The “meaty” medial part of the thigh is relatively low risk. Nerves here include the femoral (and femoral cutaneous) and superficial peroneal nerve, damage to which can cause “foot drop.”
Equipment
PIR – clothing!
A sports bra, snug-fitting top, or nude on top works best for most folks. Having a layer of fabric between you and the rope can greatly improve comfort (by cutting down on rope vs. skin friction) and sometimes decrease rope marks.
Most folks find underwires under chest harnesses to be uncomfortable (and potentially dangerous).
Avoid clothing with embellishments like buttons, zippers, jewels, etc.
Tying over shoes/boots can make a triangle suspension much more sustainable. Look for shoes with a solid sole and distinct space after the heel (not wedges). Tying over shoes can damage them—don’t use your favorites.
Rope!
For uplines, we strongly recommend using a rated rope (especially for the chest line)
6mm POSH has a breaking strength of 1,200lbs
⅛” AmSteel has a breaking strength of 2,500lbs (look for AS-78)
Both are available at boating supply stores, online, or in person!
POSH is also available from Twisted Monk (use code TWISTEDWINDOWS for a discount)
MFP/nylon may be more comfortable/sustainable than natural fiber ropes for harnesses, especially in dynamic rigs.
We recommend Chromaknotz nylon. Use code “Twistedwindows” for a discount!
Carabiners and swivels
Make sure they are rated and from a reputable source.
We recommend roomy pear or oval-shaped locking carabiners. Ex: Black Diamond Rocklock Screwgate Carabiner
Disadvantages/challenges with this rig
For the flyer to move independently, some amount of core strength and body awareness is required.
For some, this type of rig may not connect to their idea of what bondage is or should be or what they find sexy or challenging about bondage.
Requires new ways of structuring a bondage scene.
Tips for Flyers
This is a challenging suspension for many folks because it heavily loads the chest and is strenuous. Within that, there are multiple steps we can take to try to make it as sustainable as possible.
Pick a chest harness that is as supportive/sustainable as possible. Consider adding extra wraps or even using 8mm rope rather than 6mm.
Tying a foot cuff, possibly over shoes, rather than using ankle cuffs
Tying over leggings
Consider warming up (possibly including dynamic stretching)
Static stretching is not warm-up! Studies show that static stretching before strenuous activity is not effective in preventing injury or soreness. Static stretching can be good for building flexibility, but that’s a different practice.
Pee right before you start! Even if you don’t think you need to!
If you’re prone to motion sickness or nausea, consider locating the nearest trash can, just in case. It may help to watch what you eat for a few hours before the scene—stick with bland food, minimal protein, and nothing too acidic. Grains, bananas, cereal bars, etc., work for many folks. Don’t go into the suspension starving…but don’t go in with a full stomach.
Dynamic suspensions will be a different “intense sensation” type than you may be used to processing. Give your body time to get used to the rig. As with all kinds of bondage, you’ll build a tolerance to the specific sensations over time and repeated exposure. Keep track of “good pain” vs. “bad pain,” communicate, change position to change the pressure points, and constantly self-check to see if the sensations are ones you can process (or can learn to process) or warning signs of damage.
“It is a defining characteristic of human sensory and motor systems that they habituate with repeated use…” – Adapting to Artificial Gravity at High Rotational Speeds, NASA Astrophysics Data System.

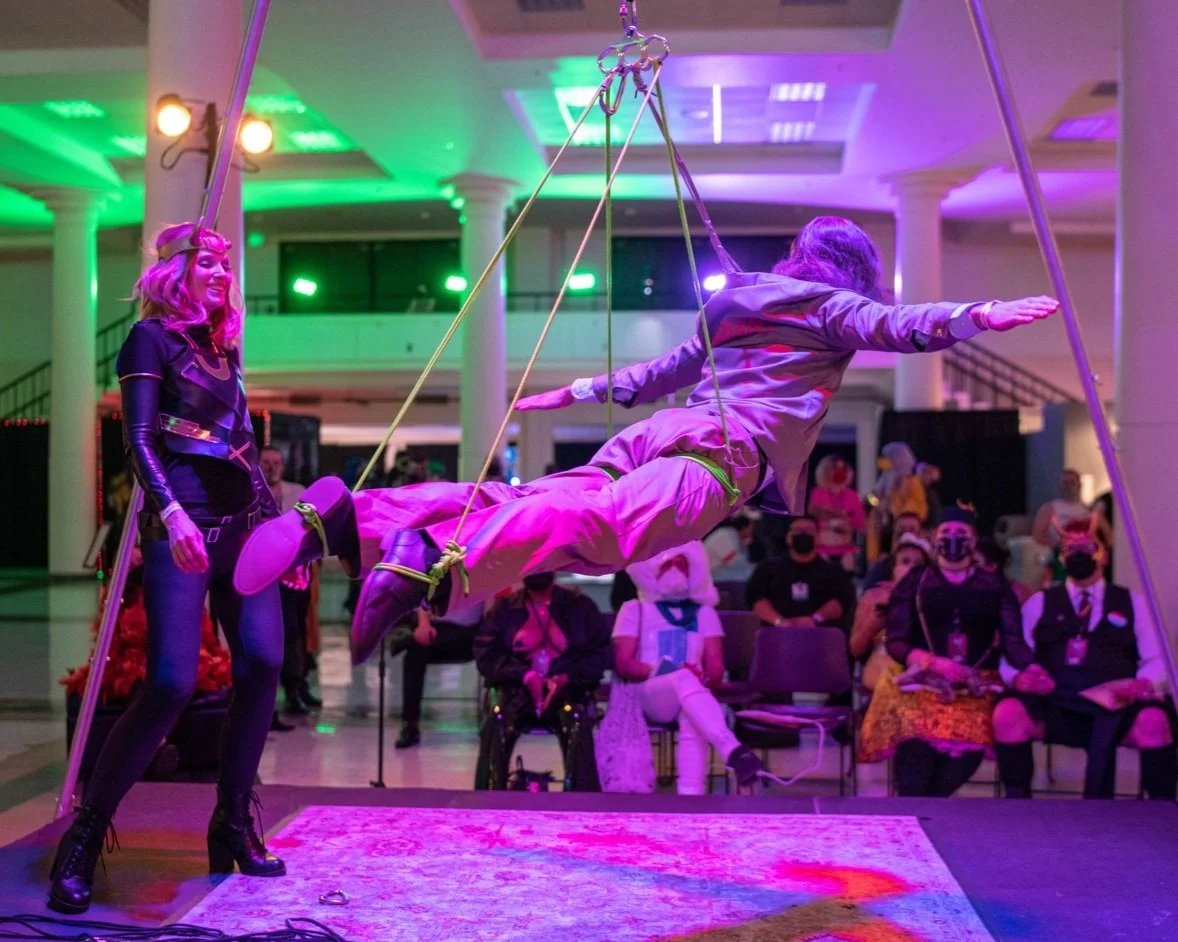
Procedure (basic triangle rig)
This suspension sequence is shown on pages 202 - 209 of Tying & Flying.
Set-up: Ring or rigging plate
Hang your ring/rigging plate as high as possible while still being able to reach it without struggling. If the PIR is too close to the ring, it will significantly decrease mobility and comfort in this rig.
The ring should be a minimum of a foot above the PIR’s head.
Set-up: supplies
Always take the time to carefully set up your supplies. One of the first things they train beginning chefs to do is to set up a mise en place, not just jump into creating. It will ease all the rest of your decisions and cognitive load to have everything set.
Self-suspenders either need someone to hand them rope/carabiners, or need to clip supplies to themselves or on/next to their ring or rigging plate (one the chest line is attached, you won’t be able to reach the ground with your hands).
Or you can grab things with your toes?
Chest harness and upline
Pages 104 - 106 of Tying & Flying show a chest harness intended to load from the back.
To anchor a hanger to the back of this harness when self-tying, I attach the hanger at step 2B, with an extra long loop that I can reach over my shoulder (steps 1 - 4 on page 162, and then a variation on page 154). I don’t use a carabiner, which would be banging into my back and neck.
This harness will mostly be loaded in an upright position, so we should make the hanger at this angle. See page 157 of Tying & Flying for details.
See pages 17 - 19 of Soaring & Exploring for a back-loading hanger attachment by Kissmedeadlydoll.
If you make a hanger on the side and then let it slide around to the back, then you have to remember to keep that shoulder/side down unless you want the hanger to come back around to the side.
Highly recommend any floating hangers be over clothing to avoid them taking bits of skin with them as they slide.
You can also experiment with the chest hanger attached from the side or the front
A hanger on the front allows more backbends.
Consider “royal self-tying” where you bid it done.
If you see me doing a self-suspension performance with a chest harness, that is never something I have tied myself. I have my spotter tie it and attach the hanger before I go on stage. IMO, you don’t get extra attaboy points for wearing yourself out tying behind your back, so if you feel like you need permission to have help, then this is me giving you permission.
When Angel has a hip harness for our partnered ties, he almost always ties those himself, and I tie everything else.
Special considerations for using amsteel
It is slippery and prone to jamming – use a very secure tie-off!
It is not good for adjusting uplines
Why do I like it?
Small profile, clean appearance, avoids giant rope potato
Super strong
For the chest & feet only variation:
Tie a chest harness intended to load in a face-down position (knots should be in the back).
For the feet, you have multiple options:
Tie a basic single column above the ankle
Tie a basic single column around the sole of the foot
Tie a gravity boot, foot cuff, gravity stirrup (pages 253 - 255 of Soaring & Exploring) or similar tie that loads both the ankle and foot
Tie a calf harness
Tie a single column or foot cuff around shoes (this makes the rig much more sustainable and is basically cheating)
…generally, folks find it gives much more maneuverability and sustainability to tie the foot in some way rather than just the ankle.
Tie off the chest harness while the PIR is under the ring at standing height (rated rope highly recommended).
Raise one foot in front of the PIR’s body and tie off the upline. Generally, around the hip level is a good starting place. Folks who are less flexible through the hips may do better with the legs lower.
Raise the other foot in front of the PIR’s body and tie off the upline. It can help to rest the 2nd foot on top of the first (already secured) leg, or to raise the thighs first.
Experiment with different heights and see what works best! The feet can be the same height but don’t have to be. Asymmetry can be more challenging to process. The rig will feel very different with different foot heights.
PIR who have an aerial background will recognize that this is a bit like being in silks with two foot locks (but with a chest “safety” line) – there are loads of possibilities for “getting frisky with those uplines” as Nil (an awesome aerial-trained PIR) put it!

Chest/Thigh/Foot Variation:
Follow the procedure above, but add a single column (with good tension) around each thigh.
Instead of tying off the feet directly, tie an unlocked line from each thigh to the foot on that side. The line should not be secured at the top; it should just run through the carabiner to allow adjustment and movement of the line. There are three ways to create this running line:
Tie the foot with a 30-foot piece, and use the remaining line to attach to a thigh cuff tied with a 15-foot piece (or a leg ladder or thigh cage). Pages 253 - 255 of Soaring & Exploring show a “gravity stirrup” perfect for this method (by Willow).
Tie the thigh cuff with a 30-foot piece, and use the remaining line to attach to a foot cuff tied with a 15-foot piece. Page 203 of Tying & Flying shows this attachment.
Tie both the thigh cuff and the foot cuff with 15-foot pieces, and use a separate line to attach them.
Other Variations and Notes:
You can also experiment with attaching just from the thighs, either from a leg ladder, a modified/expanded gunslinger-style harness, or a cuff on each thigh.
This can offer more support and take some weight off the chest. However, the smaller “window” between the thigh lines limits mobility.
Some PIR will need a partner (rigger/spotter/friend etc.) to help change their position.
Depending on the PIR's center of balance, they may get "stuck" in certain positions.
PIR may consider grabbing their uplines to help move around.
Scene dynamics
This type of bondage promotes body awareness and being in the moment.
It can be a performance, like a dance—celebrating and exploring the changes in movement and capabilities. Exhibitionism and showing off on the flyer’s side; admiring, appreciation, and objectification on the tyer’s side.
It can be more sadistic.
Run through positions. This can be anything from kink positions or yoga poses.
Impact play—whatever body part the flyer presents becomes the target.
Rough body play and wrestling while the flyer is in the air
Consider the different ways to cause pain – *ahem* “intense sensations” – in rope
1. Pressure from the rope itself.
a. I don’t find this an interesting way to cause pain, and as a self-suspender, I don’t enjoy that type of pain.
b. I generally go to a lot of trouble to minimize this type of pain (for example by using nylon rope, more wraps, tying over shoes, wearing leggings, etc.)
2. Stress or stretch positioning—I like this and find it more interesting!
3. Exhaustion (another interesting and often under-explored area)
4. Doing other mean things (spanking, slapping)
Suspension Sequence
Seated position: Back of chest and a column around each thigh or a mermaid tie (exploding?)
3-point triangle rig: Tie off feet and release thighs.
Potential shapes to explore include a running person, splits, pinwheel, lotus, birdcage, pike, and many more.
Face up: Attach a hip harness from the front. Release the foot lines and tie the legs into a bent shape.
Consider a flyer-driven transition into face down.
Inversion: Ensure that the hips are attached high enough so that the PIR will not hit their head when they invert. Detach the chest line and lower into an inversion.
Consider leg variations in this position.
Side suspension: Attach the chest from the front or side. Keep this upline long/the chest low. Lower the hip line to come into either a face-up or side suspension. Consider how to create additional torsion in this shape.
Lower into a partial, either chest or hips down first.


